 PostTrans XL Visual Importer: Install/Upgrade Notes
This page can be easily printed for later reference…
System Requirements:
- Windows 2000 onwards with Office 2003 onwards
- A Desktop Pentium 200 with 64mb of Ram
- Exchequer Installed and Working
- Exchequer COM/DLL Toolkit License unlocked
- Office 32/64bit is supported since V16.2.0 for Exchequer V2016 R2.
- Exchequer MS SQL Version has minor restrictions, see Common Support Q/A.
Installing PostTrans and Testing
Make sure the Exchequer COM Toolkit is unlocked
PostTrans is simple to install. It is installed much the same as Exchequer.
Install on system ONCE in Exchequer directory
Simply download the installer.
Run on a PC which has had Exchequer previously installed on it. For Terminal Server see Extra Notes
Simply [Next] all options on install routine, do not change destination directory.
This will have installed the program, in the Exchequer directory, for installation in each client PC.
Installing on each client
IMPORTANT: if the following install fails, please read this page : Cannot Access Exchequer Drive while Elevated
Step 1 - Install PostTrans.XLA
Open Excel and add PostTrans.xla add-in the same way as Exchequer OLE is installed.
Click on "File" tab Select "Options" on left-hand side On the new window that opened, select "add-ins" on left-hand side Now press [Go] button Then...Click on [browse] button Browse to Exchequer directory Select PostTrans.xla Remember: Answer "NO" to copy message. |
Step 2 - Install Extra Components (if need be)
PostTrans may ask to install client components, during the above test, if need be.
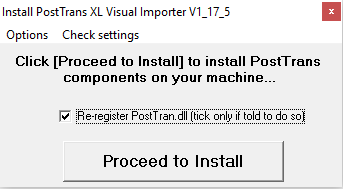
Please tick the box and press [Proceed to install]. This install various required DLL's.
If this fails: Often the install runs as admin user, but admin user cannot see the Exchequer drive, so please read Cannot Access Exchequer Drive while Elevated. This install is PostTransInstall.exe in the Exchequer directory if you wish to run manually.
It's important to test the installation. Simply go to the PostTrans toolbat and press the [Help] button.

this will display all the examples which come with PostTrans:
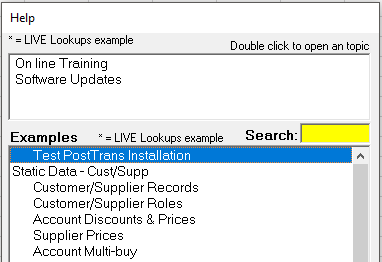
Select top example. And now press [Update Lookups] button:
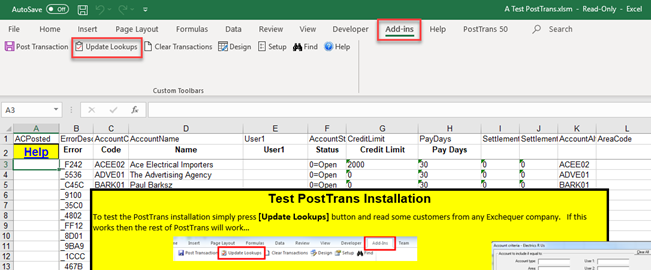
This will then check that all components have been installed ok. If not you will be prompted to install them as discussed in next section.
Unlock
For demo purposes PostTrans will automatically work with “Electrics R Us” Enterprise Demonstration Company.
You may be then asked if you want to use the current license, or if used for the first time, create a License. In which case please create a license and enter your details. We will then unlock the correct number of users if you have already Ordered. Our system will send us an e-mail that you created a license, so we can enable it automatically if need be.
After we unlocked the software, the next time you use PostTrans, it will get the license information from our licensing data server, or byb pressing [Refresh Registration Details] within the [Setup] window..
Test
Press [Clear and Lookup Values] button on the window, which was shown after pressing the [Update Lookups] button earlier. PostTrans will now extract customer data from Exchequer. If this works PostTrans will now work OK
Important: Excel 2010+ Security issues
Additional actions for Terminal Server
If possible install the above, and test, while logged in a Admin user.
Next publish the PostTrans Install to other users using the following:
- Open a command prompt
- Navigate to directory
- Enter:
c:\windows\system32\change user /install |
|---|
PostTrans should now work for other users, after selecting the PostTrans.xla within Excel
How to Upgrade:
Simply download the installer.
Make sure all PC’s with PostTrans installed in excel have excel closed.
Run on a PC which has had Exchequer previously installed on it.
Simply [Next] all options on install routine.
Done
Important: With ALL copies of Excel closed which have PostTrans loaded