PostTrans XL Visual Importer: PostTrans System Settings
The following page, discusses the system settings within PostTrans:
- System Setup - General Tab
- System Setup - Trans Switches Tab
- System Setup - Confirmation Tab
- System Setup - Default Values Tab
- System Setup - Transaction Header Tab
- System Setup - Transaction Header2 Tab
- System Setup - Transaction Header3 Tab
- System Setup - Printing Tab
- System Setup - Other Tab
- System Setup - Chain Posting Tab
- System Setup - Authorisation Tab
- System Setup - Payments Tab + THAddMatch
- System Setup - Live Lookups
- System Setup - B2B
- PostTrans Toolbar
- Deletion Markers to Clear Transactions, button on PostTrans Toolbar
 PostTrans Training School: Your 25 minute free personal training videos
We have developed a 25 minute training course to give you a complete understanding of how to create your own PostTrans templates to achieve your goals, using our example templates as a starting point.
System Setup - General Tab -  button on PostTrans Toolbar
When the user presses the [Post Transaction] button, PostTrans uses the settings found in the “defaults” sheet, of the template. These settings are stored in the “defaults” sheet, but should only be edited from the ![]() button, on the PostTrans Toolbar. You should never edit the “defaults” sheet directly.
button, on the PostTrans Toolbar. You should never edit the “defaults” sheet directly.
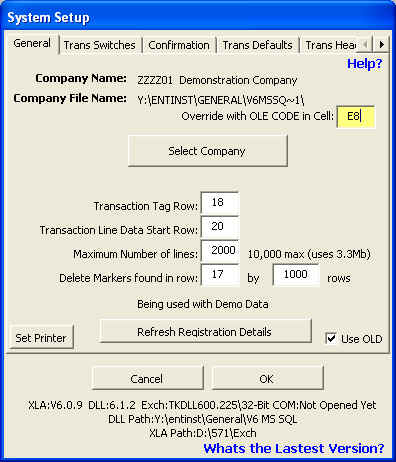
When the user attempts to import for the first time PostTrans will force you to set the company to import into automatically.
|
Option |
Description |
Override with OLE CODE in Cell |
CellRef: Use the OLE code specified in cell to determine the company PostTrans will import into. Also used by Authorise-e to get user. |
|
Transaction Tag Row |
This is the row where, when importing transactions, PostTrans will look for tags to identify Exchequer Enterprise fields |
|
Transaction Line Data start row |
This is the row where, when importing transactions, PostTrans will expect to find data |
|
Maximum Number of lines |
Maximum Number of lines, in spreadsheet PostTrans will read |
|
Delete Markers fount in row |
This is the row where, used to identify deletion markers. More on deletion markers |
System Setup - Trans Switches Tab - button on PostTrans Toolbar

Under this tab, various settings can be altered when importing Transactions:
|
Option |
Description |
|
Use Account 'Alt Search Ref' to match accounts instead of code |
When ON PostTrans will convert account "Alt Ref" code to account codes when importing data This allows account data to be imported from an external system, with external reference in account “Alt ref” field. Then use this external reference in transaction data, in the ACCode. PostTrans will then lookup the account based on "Alt Ref" code, and convert to Exchequer code behind the scenes. |
|
Don't enforce Job codes in Job Code Cells |
If on then makes user fill in all job codes specified Turn on for timesheets, etc |
|
Manually Calc VAT (by-pass Exchequer VAT Verification |
VAT will be specified on spread sheet, and manually calc flag turn on for each transactions. Use with care, as VAT amounts are not validated when ON. Used to overcome rounding VAT issues. |
|
Allow Manual VAT adjustment buttons on Confirmation Window |
Displays buttons to allow user to adjust VAT by +/- 0.01 pence on confirmation window. This allows slight adjustment when importing from external systems which use different rounding rules. Note it adjusts whatever VAT code has the highest value. |
|
Ignore 0 qty stock values on Transactions and Zero value on NOMs |
This allows a template containing a list of stock codes to be used. The user can simply enter qty against stock codes they wish to order/stock adjust, PostTrans will ignore any lines with 0 qty. Used for Simple Order pad using excel Also works on NOMs for zero credit/Debit values and TSH hours = 0 Note: This is automatically turned on for ADJ's The "Quick Order Pad", "ADJ", "Timesheet" Examples shows this in action. Click here for more information on PostTrans examples |
|
Discount as % |
Any Discount specified, will be a percentage, else PostTrans assumes an amount |
|
Write back lookups and defaults |
Write back any values looked from Exchequer Enterprise database. For Example when importing Timesheets PostTrans will fill in Cost and Charge out rates in spreadsheet if not specified when [Update Lookups] button is pressed |
To stop multiple lines being added from stock record, when using multiple lines on a transaction import
Click here for more inforation about Transaction Descriptions |
|
and break on "," |
If ticked then lines are broken up using "," in description line on Transactions Also effects Stock import too, so Desc1 becomes the 6 lines, separated by "," but this character can change since V7.3.20 LIVE LOOKUPS will turn this option ON automatically |
Allow Zero Sales/Cost price |
If ticked then allows Zero Sales/Cost price to be posted. Setting "with warning" displays a warning to the user for them to check values on confirmation window. |
|
If Account Code on Transaction is un-recgonised:
|
|
|
Allow User to change Account Code |
Allow User to change Account Code, from within the confirmation window before posting |
|
Allow user to create account called 'UNKOWN' |
If Account does not exist in Exchequer Enterprise, then create an account using specified account code, but give name "UNKOWN". These accounts can then be found using Enterprise search, and details added later. |
|
Warn before creating new 'UNKOWN' Account |
Warn user before creating above account |
System Setup - Confirmation Tab - button on PostTrans Toolbar
Under this tab, confirmation settings can be altered, which are shown when importing Transactions:

|
Option |
Description |
|
Before Posting Transaction:
|
|
|
Show Confirmation before posting transaction |
Turn ON/OFF confirmation window. You may want to suppress this window if importing data which contains multiple Transactions from an external system. Note : Credit Check will not be applied if this is turned OFF |
|
Show Cost Centre/Department break down |
Turn ON/OFF |
|
Show Job Costing break down |
Turn ON/OFF |
|
Show Stock Code break down |
Turn ON/OFF |
|
Apply Credit Check |
Warn user if over account over credit limit, on stop, see notes, closed. User can still import transaction but will be on "Credit hold" status Note : Will only check this if Confirmation is enabled |
Do NOT allow negative Stock |
If ON will stop user posting stock QTY which will make system go negative |
|
Allow overwrite transaction |
Allows user to amend transaction and repost into Exchequer When posted, PostTrans deletes all existing lines on Transaction, then adds the lines again Note : It does not clear notes lines or links when being overwritten Will not update TSH/ADJ/SRI/PPY/NOM transactions For single Transactions only
The "SQU" Example shows this in action. Click here for more information on PostTrans examples |
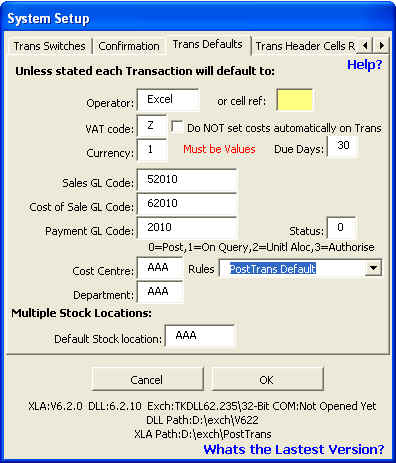
System Setup - Default Values Tab - button on PostTrans Toolbar
When this window is closed PostTrans will validate default GL/Cost Centre codes entered in the setup window. If these are invalid please set the appropriate values in:
|
Option |
Description |
|
Operator |
When importing a Transaction, stamp with this operator name |
else in Cell Ref |
CellRef: Enter here the cell where PostTrans will find Exchequer Operator name |
|
Currency |
When importing a Transaction, use this as default currency 1-89, unless overidden on sheet. |
|
Sales GL Code |
Uses Stock default Sales GL, else this value, unless overidden on sheet. |
|
Cost of Sale GL Code |
Uses Stock default Cost of Sales GL, else this value, unless overidden on sheet. |
|
Payment GL Code |
When importing a Transaction, use this default GL for payment lines, unless overidden on sheet. |
|
VAT code |
When importing a Transaction, use this default VAT code |
|
Due Days |
When importing a Transaction, if not specified then due date is Transaction date + Enterprise due days for customer |
|
Cost Centre |
When importing a Transaction, use this default, according to "Rules" below. |
|
Department |
When importing a Transaction, use this default, according to "Rules" below. |
Rules |
"PostTrans Default" (Use the default value given on this page), "Stock, Account, PostTrans Default" or "Account, Stock, PostTrans Default" for Cost Centre and Department |
|
Status |
When importing a Transaction, give status 0=Post,1=On Query,2=Unitl Aloc,3=Authorise |
or in cell |
Post status using value from cell ref, overides the "Status" field |
|
Default Stock location |
If Locations is turned on, then use this location if not specified on Transactions. |
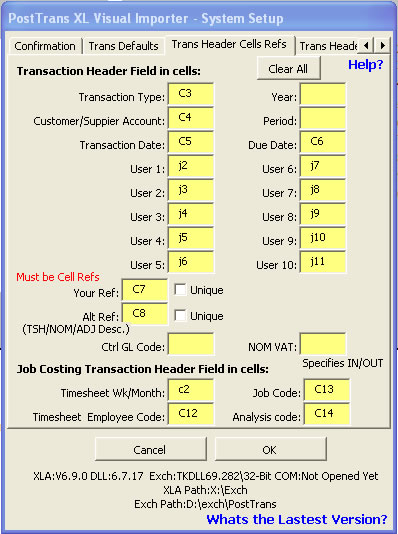
System Setup - Transaction Header Tab - button on PostTrans Toolbar
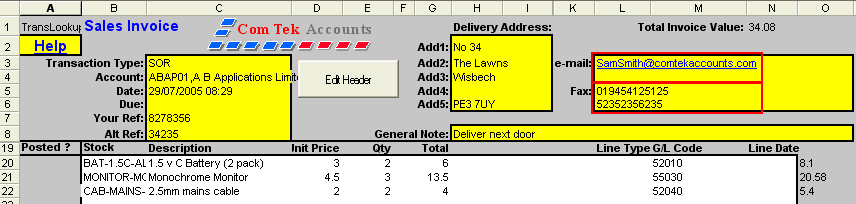
Unwanted fields can be left blank. Note you must be careful when adding columns to the template. For example if we add a column between D and E then “Delivery address will no longer be in cell H3-H7 and Post Trans will see the first lines as “Add1:”.
When importing Transactions, we have to set various Transaction Header fields as well as specifying transaction lines such as AccountCode, TransaDate, Duedate, etc. Shown in red below:
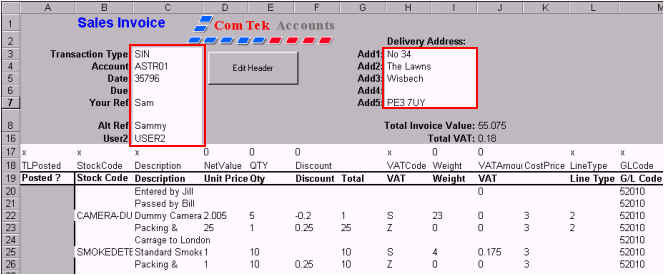
Where we position these fields are specified in the System Setup under the "Trans Header Cell Refs" and "Trans Header Cell2":
|
Option |
Description |
|
Transaction Type |
CellRef: SIN,PIN,SOR,ADJ... |
|
Customer/Supplier Account: |
CellRef: Customer/Supplier account code. Ignores anything after "," |
|
Transaction Date |
CellRef: Date of Transaction |
|
Due Date |
CellRef: Due Date if applicable |
|
Your Ref |
CellRef: Subject or description of Fax/e-mail |
|
Alt Ref.
|
CellRef: Alt Ref. or Description on TSH/NOM/ADJ Transactions
|
|
Unique
|
This tick box ensures a transaction has not been posted before by checking that the select ref has not been posted against the account before
|
Ctrl GL Code |
CellRef: Transaction Control GL Code. If not specified then PostTrans will use the default in Enterprise |
|
Year |
CellRef: Normally set automatically |
|
Period |
CellRef: Normally set automatically |
User 1-4 |
CellRef: Transaction Header User fields 1-4 |
User 5-10 |
CellRef: Transaction Header User fields 5-10 (V6.9+) |
Timesheet Wk/Month |
CellRef: Timesheet Wk no |
Timesheet Employee Code |
CellRef: Timesheet Employee Code . Ignores anything after "," |
|
Job Code |
CellRef: Default Job Code for all lines. Ignores anything after "," |
|
Analysis code |
CellRef: Default Analysis Code for all lines. Ignores anything after "," |
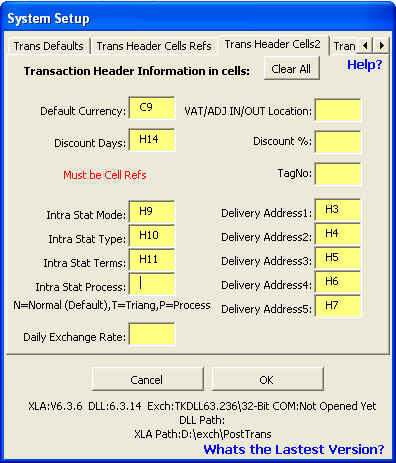
System Setup - Transaction Header2 Tab - button on PostTrans Toolbar
Unwanted fields can be left blank. Note you must be careful when adding columns to the template. For example if we add a column between D and E then “Delivery address will no longer be in cell H3-H7 and Post Trans will see the first lines as “Add1:”.
|
Option |
Description |
|
Default Currency |
CellRef: 1-89 (if multi currency system) Ignores anything after "," |
|
e-mail, if email in cell |
CellRef: 2 cell references where the e-mail address will be found in spreadsheet |
|
CellRef: When posting ADJ, post opposite side to this location When using Multi-Bins, by using Tag 'BinContraCode' you can specify the new Bin location to move stock IN When using Serial/Batch items, the serial/batch number will be moved IN to this location Video: ADJ
Also if added to a transaction, in the PRO version, then is popultate with default location on Cust/Supp selection. All stock searches will then use this value to display free stock for location. |
|
|
Discount Days |
CellRef: Apply settlement discount after x days. |
|
Discount % |
CellRef: Apply settlement discount percentage |
|
Tag No |
CellRef: Tag no of transaction |
|
Intra Stat ... |
CellRef: Intra stat fields. Intra stat process defaults to N for normal |
|
Daily Exchange rate |
CellRef: Exchange rate of transaction |
|
Delivery Address 1...5 |
CellRef: Transaction Delivery address lines 1...5 |
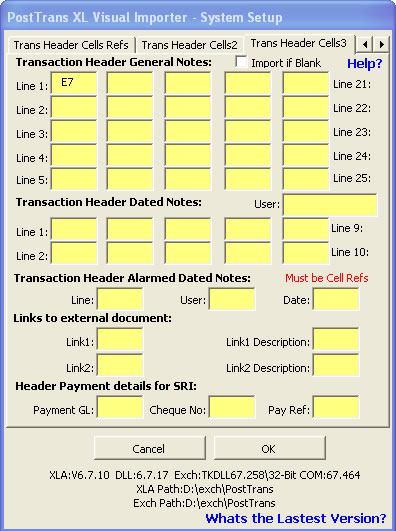
System Setup - Transaction Header3 Tab - button on PostTrans Toolbar
Video: Talk about notes
Notes can be easily added to a Transaction using these settings:
|
Option |
Description |
Transaction Header General Notes |
|
|
Line 1...25 |
CellRef: These cell references allow up to 25 lines to be specified which import General Notes. All of these lines word wrap, so each can be really long. (chr$(10) or "<br>" gives new line) Notes line 1 can be overridden on each line of transaction using in Tag "THGNotes" The "Other Transactions >> SOR" Example shows this in action. Click here for more information on PostTrans examples |
|
Import Blank Lines |
When OFF PostTrans skips lines which are blank. When ON PostTrans will import lines even if blank, this allows extra information to be posted with a transaction, and printed on an Exchequer Invoice/Order, since we always know the line number of the extra information. |
Transaction Header Dated Notes |
|
User |
CellRef: User for Dated notes import line 1-10 |
Line 1...10 |
CellRef: These cell references allow up to 10 lines to be specified which import Dated Notes. The Swich "Import Blank Lines" can be used to make sure the data goes into specified line number. |
|
Transaction Header Alarmed Dated Notes
|
|
|
Lines |
CellRef: Line of alarm note The "Other Transactions >> SOR" Example shows this in action. Click here for more information on PostTrans examples |
|
User |
CellRef: User for alarm. |
|
Date |
CellRef: Date for Alarm. If nothing is specified then today's date will be used |
|
Links to external document:
|
|
|
Link1/2 |
CellRef: Filename of file including path (84 characters), which is posted as a linked document into Enterprise. |
|
Link1/2 Description |
CellRef: Description of file |
|
Header Payment details for SRI |
|
|
Payment GL |
CellRef: Payment line GL code Note : If this cell is has contents then attempts to use this information for payment line The "Other Transactions >> SRI" Example shows this in action. Click here for more information on PostTrans examples |
|
Cheque No |
CellRef: Cheque No for payment line |
|
Pay Ref |
CellRef: Payment ref, as appears in bank rec |
System Setup - Printing Tab - button on PostTrans Toolbar
This is only available in the Professional version of PostTrans
Video: Show me a video on Quick Order Pad/Telesales including Printing
Video: Talk about printing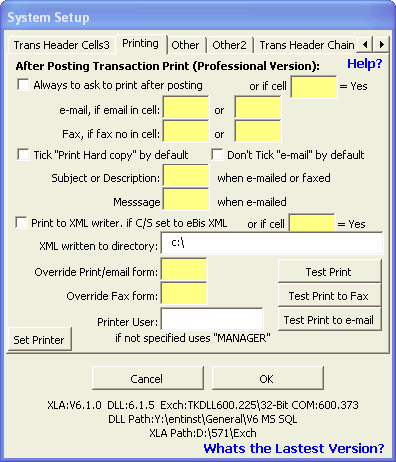
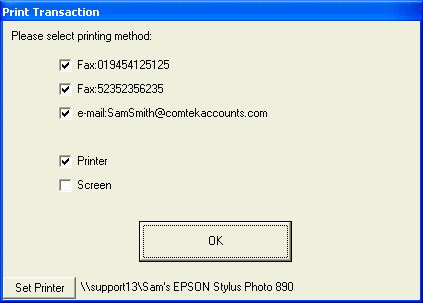
This Tab under system setup, allows you print a transaction, after it is posted to Enterprise:
|
Option |
Description |
|
Always to ask to print after posting |
If ON, then PostTrans will prompt for printing after transaction has been posted, using Enterprise default form for transaction The "SQU" Example shows this in action. Click here for more information on PostTrans examples |
|
or e-mail, if email in cell |
CellRef: 2 cell references where the e-mail address will be found in spreadsheet |
|
Fax, if fax no in cell |
CellRef: 2 cell references where the Fax number will be found in spreadsheet |
|
Tick "Print Hard copy" by default |
If ON, then defaults to printing a hard copy |
|
Don't Tick "e-mail" by default |
If ON, then printing is un-ticked by default |
|
Subject or Description |
CellRef: Subject or description of Fax/e-mail |
|
Message |
CellRef: Cell reference to body of e-mail text |
|
Override Print/email form |
CellRef: Cell reference, to override Enterprise default form, when printing and e-mailing |
|
Print to XML writer, if C/S set to eBix |
Will write the Transactions to XML file, for eBis module to send to Customer or Supplier if set to "XML eBis" on the Customer/Supplier record |
|
or if email in cell |
CellRef: If cell contains "YES" the create XML transaction. this overrides above if YES |
|
XML written to directory |
Write XML transactions to directory. This should be the same directory the eBis module is using to auto send. |
|
Override Fax form |
CellRef: Cell reference, to override Enterprise default form, when faxing |
|
Printer User |
CellRef: This needs to be a valid Exchequer user |
Thus with the above settings we can create a Sales order entry spreadsheet which faxes or e-mails, up to two different
After posting the user is prompted with:
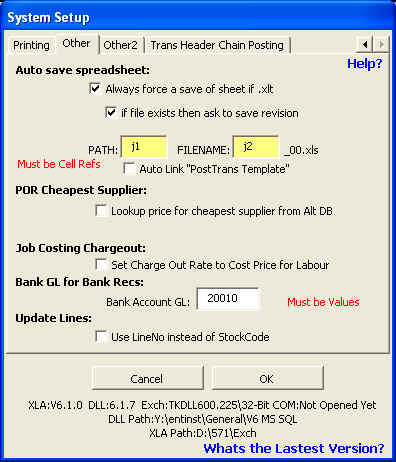
System Setup - Other Tab - button on PostTrans Toolbar
|
Option |
Description |
|
Auto save spreadsheet: |
Save before and after posting a Transaction |
|
Always force a save of sheet if .xlt |
Save as PATH & SUBDIR & YYYYMM & FILENAME & "_00000.xls" before importing. (84 char limit) This option can be used in conjunction with "Auto Link "PostTrans Template"", to link the transaction to current sheet. SUBDIR, YYYYMM are optional. see below. The "SQU" Example shows this in action. Click here for more information on PostTrans examples Video : Sales Quotes with revision history It is recomment to save the template as a XLT file to stop users saving over it. |
|
if file exists then ask to save revision |
If file already exists then ask user to save a revision. PATH & FILENAME & "_xxxxx.xls" before importing. where xx is a count. |
|
PATH |
CellRef: Points to cell containingroot path to save transaction. "Sub Directory" and YYYYMM are appended if turned on. |
|
FILENAME |
CellRef: Points to cell containing Filename of sheet. Use a unique reference number (Job No,Date first entered, etc) |
Sub Directory |
Optional, but if points to account code cell then will place documents in seperate folder for each account code. (V7.3.12). Folder is created if it does not exist. |
|
Create sub folder YYYYMM |
Put files in directory for each month in format YYYYMM. This helps reduce the size of each folder and makes external links more managable. (V7.3.12) Folder is created if it does not exist. |
|
Auto Link "PostTrans Template" |
This automatically links current spreadsheet to Transaction when posted, under name "PostTrans Template".
The "SQU" Example shows this in action. Click here for more information on PostTrans examples Video : Sales Quotes with revision history
VERY IMPORTANT: Note the filename, including path should not exceed 84 characters (limit in Exchequer). PostTrans will validate this. |
|
Lookup price for cheapest supplier from Alt DB |
When turned on this function looks up prices from Alternative DB for cheapest supplier The "Cheapest Supplier" Example shows this in action. Click here for more information on PostTrans examples |
|
Job Costing Chargeout: |
|
|
Set Charge Out Rate to Cost Price for Labour |
If ticked, then will set Job costing Chargeout rate to NetValue for all lines with a Labour analysis code has Line Type 1 (Labour by default) |
|
Bank GL for Bank Recs: |
|
|
Bank Account GL |
Default Bank Account GL when importing Back reconciliation data. Click here for more information
The "GL and bank rec" Example shows this in action. Click here for more information on PostTrans examples |
|
Update Lines: |
|
Use LineNo instead of StockCode |
Normally the update lines procedure updates lines by matching by Stockcode, when on it will match by LineNo. |
|
Display X Notes lines |
Tag THLastGenNote and THLastDateNote return X lines. |
System Setup - Chain Posting Tab - button on PostTrans Toolbar
This allows the developer to chain post two PostTrans sheets, having pressed the [Post Transaction] button.
"Transacton BackToBack ..." examples demo this
Video: Talk about chaining
Video: about Sales Order with Back to Back Purchase Order with auto pick when received

|
Option |
Description |
|
Chain Postings |
|
|
Warning Validation |
CellRef: If the cell contains text, then PostTrans displays the text as message. The contents of the cell must be cleared before posting can be made. The text in cell can be the result of a formula. Thus your validation formula can stop the posting of transaction. |
|
Sheet to Post Next |
CellRef: The name of the next sheet to post, after attempting the first one. The first sheet must be posted before posting the second sheet. |
|
Write OurRef after Posting |
CellRef: After posting PostTrans writes back the OurRef back to this cell. This allows the designer to use this ref when posting POR's, to allow "Auto picked when purchase order received" |
|
And add sideways drill link |
|
|
Other Transaction Ref |
CellRef: This links a POR to the SOR transaction ref. Thus linking in the sideways drill |
|
Name to put against |
CellRef: Name put against the sideways linking |
Auto picked when purchase order received |
Sets the Auto pick when the POR is received. Note : This function has to match off stock codes in SOR & POR. To allow duplicate stock codes in a Transaction, it also uses TLUser3 to match off relates lines in SOR -> POR. So map something unique to TLUser3, e.g. Line number, which is mapped on the SOR and POR. |
Update Another Transaction after Posting |
|
if cell x has OurRef in it |
CellRef: This allows a previously posted transaction, to have the referance of the transaction just posted, put in THYourRef, THAltRef, THUser 1-4. Note: THYourRef, THAltRef cannot be updated if Trasaction is a SRI, since it is allocated and the COM Toolkit does not allow update. Any attempt to update these fields will be ignored. Also, If cell contains "OLECODE, Reference " then the Reference is posted to the company referred to by OLECODE. |
Save In |
Where to put on transaction |
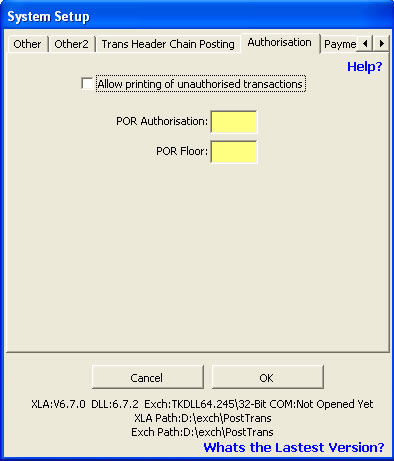
System Setup - Authorisation Tab - button on PostTrans Toolbar
PostTrans will respect the Enterprise Authoris-e™ module. An additional download is required, see download page for download
The cell ref, under tab “Tran Defaults”, “Or in cell ref” cell ref is used to supply the Operator/Username name for requesting the Authorisation/Floor limit.
Note: PostTrans cannot submit the Transaction to the Authoris-e™ module. Therefore any that need submitting, to the Authoris-e™ module, are imported "On Query". A user should then submit all transactions by highlighting the transaction, then press the [Authorise] button.
Holding down ALT, at the start of a posting will show the Authorisation/Floor limit, retrieved from Enterprise. If not then the DLL is not in correct place.
How PostTrans Authorisation works
|
Option |
Description |
|
Allow printing of unauthorised transactions |
Allow printing of unauthorised transactions |
|
POR Authorisation |
CellRef: If set to cell ref, then get the Authorisation limit from cell* |
|
POR Floor |
CellRef: If set to cell ref, then get the Floor limit from cell* |
|
* Setting either of these, will stop PostTrans calling the authorisation module |
|
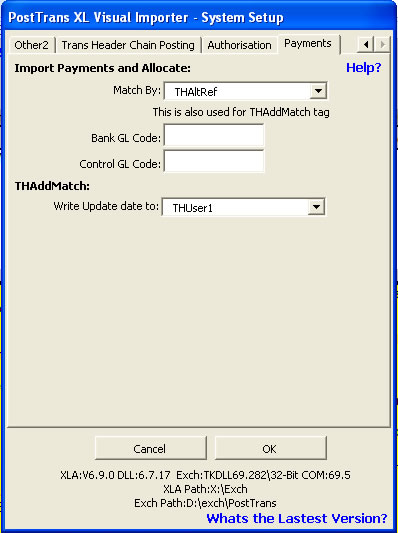
System Setup - Payments Tab + THAddMatch - button on PostTrans Toolbar
This allows the developer to import a list of payments, which are matched by THOurRef, THYourRef or THAltRef from an external system. PostTrans finds the SIN (imported by a previous process) by the external reference stored in THYourRef or THAltRef, creates a Sales Receipt and writes matching information. more about Matching Payment import
Thus the original invoice is paid off, in without having to know the SIN ref, just the unique external reference.
|
Option |
Description |
|
Match By |
matched by THOurRef, THYourRef or THAltRef Used by THAddMatch also. more on THAddMatch |
|
Bank GL Code |
Bank GL to put on SRC |
|
Control GL Code |
Optional |
|
Write Update date to |
When using THAddMatch. This will update a field in header with date last updated in YYYYMMDD format. This can then be repoert on and transactions not posted in x days can be posted from daybook. see example "Transaction Add Lines" |
System Setup - Live Lookups - button on PostTrans Toolbar
Live Lookups is covered by a separate page, PostTrans Live Lookups for Exchequer
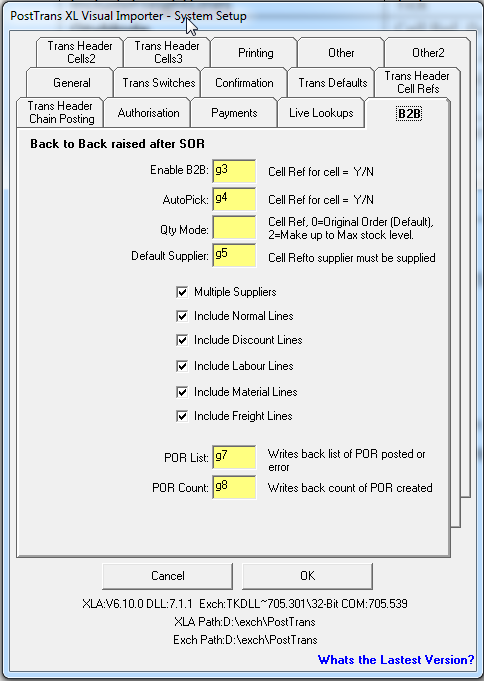
System Setup - B2B - button on PostTrans Toolbar
This tab allows the setup of B2B POR raised when posting an SOR. This follows the same rules and functionality of the Back to Back system in Exchequer.
|
Option |
Description |
|
Enable B2B |
|
|
AutoPick |
Cell Ref Y/N - Also picked SOR when POR is received |
QtyMode |
Cell Ref, 0=Original Order (Default), 2=Make up to Max stock level. |
DefaultSupplier |
Cell Ref |
|
MultipleSuppliers |
If ticked then the suppliers will be derived by the default supplier on the stock record |
IncludeNormalLines |
Tick to include these types of lines in the back to back purchase order |
|
IncludeDiscountLines |
"" |
|
IncludeLabourLines |
"" |
|
IncludeMaterialLines |
"" |
|
IncludeFreightLines |
"" |
|
POR List |
Writes back list of POR posted or error |
|
POR Count |
Writes back count of POR created |
Toolbar

|
Description |
Function |
|
Post Transaction |
Import the Transaction or data in to Exchequer company as specified in Set-up |
|
Update Lookups |
Scan data, validate and write back any looked up values |
|
Clear Transaction |
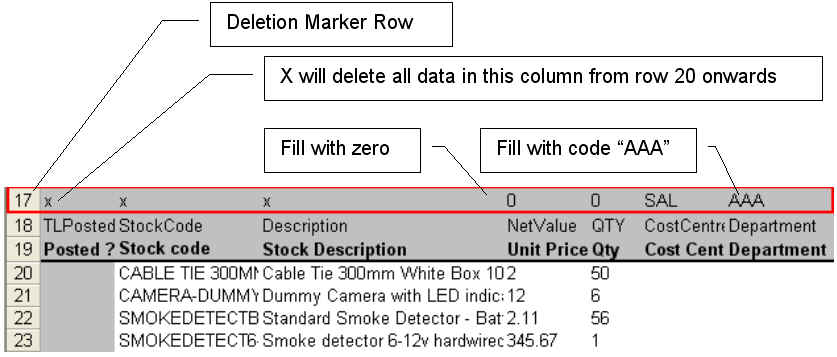
Clear Transaction, if an “X” is placed in row 17 (Default) then clears column contents. |
|
Design |
Display list of Tags (these are used to identify data in columns) |
|
Setup |
Access System Set-up, the setup data is stored in the “Defaults” sheet therefore each template can have different settings. |
Deletion Markers  button on PostTrans Toolbar
After an import, the user may press the [Clear Transaction] button, on the PostTrans Toolbar, to clear the contents of the template. PostTrans uses the markers in row 17 to clear down the transaction lines. “X” denotes clear contents; any other value is copied down the sheet. Note: This is also done automatically before reading in a Text file.